Thursday, December 12, 2013

Electoral College Simulation

Our next topic after exploring the Articles of Confederation and Constitutional Convention was Washington's presidency. Our textbook briefly describes how Washington was chosen by the Electoral College, but goes into little detail about what this was. I decided that we needed to dig deeper into this question and not only explore how the Electoral College functions today, but how it was originally designed. In the first few elections in American history, the president was not determined by a popular vote, but exclusively by the Electoral College.

First, we discussed the role of the electors as they were originally described. Because the American population at the time was often rural and far-flung and long distance communication was slow to say the least, campaigning was exceedingly difficult. Many Framers also didn't have much faith in the ability of the general populace to chose a worthy candidate for various reasons. To gather information about this particular era of the Electoral College, we watched videos and read from various sources, including The United States Constitution: A Round Table Comic by Nadja Baer. The graphic novel offers a clear, concise and visually-supported version of the events of the Constitutional Convention. 

Later, we discussed the election of 1800 and how several key flaws were discovered in the electoral system. Finally, we compared the way the college functions today to the original design on a Venn diagram after watching the following video showing the official process. 

To model the electoral process as it is conducted today, we created a mock election in which the entire middle school would participate. We created two mock candidates who represented Federalist and Democratic-Republican agendas. We chose these two political parties because of their significance during the period of history we were studying, but the lesson could easily be adapted to any two or more political parties. 

Several of the classes in the middle school were not studying this subject, so our ballots clearly explained the platforms of each candidate. Each homeroom was allowed to vote for a candidate and in our simulation, each homeroom would count as a state with a different number of electoral votes based on population. Before handing out the ballots to each homeroom, we created a fact sheet (shown below) with the electoral votes for each homeroom and a map to color in red and blue as the votes are tallied. The map is intended to look like our middle school hallway and resemble the United States maps that are color-coded during election coverage


After the election, I showed a video of typical news coverage from YouTube of the 2008 election of Barack Obama and Mitt Romney. I showed and explained how the media outlets use a complex algorithm of votes counted, exit polls, historical context and other data to project a winner for each state. Sometimes the winners are called in short order while others may continue to be counted late into the evening or even the following weeks.

Similar to the news reporting on the election, teams of students were allowed to count the votes for each "state," then "call" a state for a particular candidate when the votes were tallied. As the states were called, we kept a school map, like the one shown above, of the hallway and shaded in the homerooms either red or blue depending on the victorious candidate. Finally, when the "magic number" of electoral votes had been assigned to a candidate, we called the election. Later on, each student acted as an elector for a particular state and signed off on a certificate like the ones shown in the electoral college video above.

After our rallies complete with "state" paddles and signing the certificates, I felt that students had a much deeper understanding of how the modern Electoral College system operates and how it has changed over time.

Thursday, December 5, 2013

The Weakest Link

In discussing the forming of this new nation, the United States, I wanted students to understand why the Articles of Confederation failed, but also why the features that made it weak were built in. I wanted them to see the fears of the Framers about their experiences with British government replaced with new laws, limitations and procedures in the Articles. Finally, I wanted them to analyze what they felt was the weakest part of the plan, or the weakest link.

In order to accomplish the bold, challenging concept, we created a chain of weaknesses in the Articles that led to everything from excessively high state taxes to massive inflation. Chains are easy to create both by hand and on the computer. I wrote about using chains to demonstrate metaphors in a novel here.

In Microsoft Word, you can simply insert a one-column table with as many rows as links. By choosing a larger font or inserting spaces, the rows can be larger and allow for typing or handwriting. These rows can later be cut into strips, then curled and taped into the chains. My students used a template like the one below then typed in the weaknesses.


Students were required to choose five weaknesses based on our in-class discussion. Once the template was complete, we printed them and created chains. Students then had to choose one of the weaknesses that they felt was the most damaging or was the greatest influence on the eventual demise of the Articles. They wrote paragraphs about the so-called "weakest link."

One student had the idea of posting the paragraphs onto images of locks. One of our sources described how some of the features of the Articles "gridlocked" the government, rendering it powerless to levy taxes, regulate trade, or create a standard currency. Using the lock template, we attached the cut-out lock image to the link representing the student's selected "weakest link."


Understanding why an entire system of government failed can be daunting, but I found that this helped to break down the Articles into manageable chunks, then allowed students to analyze those weaknesses.

Friday, October 25, 2013

Photo Graphic Novels

There's a whole bunch of research out there suggesting how effective graphic novels can be effective at increasing comprehension, especially for struggling readers and those with dyslexia. But what if a suitable graphic novel doesn't exist for your particular subject matter? Or what if you have a particularly active group of learners who would benefit from a more kinesthetic lesson?

We have had a lot of fun this year with photo re-enactments and transforming those re-enactments into graphic novel-style frames with quotes and captions only enhances student understanding.

Earlier this year, my 8th grade classes analyzed Emmanuel Leutze's iconic painting, Washington Crossing the Delaware. We looked at the historical inaccuracies in the painting, as well as the symbolism that the artist sought to depict. Finally, we created a stand-up "boat" and ice chunks with some painted poster board, oars cut from cardboard and some costume hats and accessories. Students posed "in" the boat in front of a piece of large blue bulletin board paper painted with clouds and light similar to the original. The students really enjoyed this activity and seemed to really connect with the material. So, next time with another class, I took it a step further.

Later on, a different group of 8th graders used a storyboard template worksheet to plan five different scenes of the Capture of Fort Ticonderoga. For each scene, students sketched the poses, planned the props they needed and assigned character roles to each member of the group. I required that the scenes be planned in detail so that on shooting day, each group was only allotted 10 minutes for each scene.

To conclude the activity, I imported the photos into a Word document and framed each picture with a black border. As a class, we added captions, thought bubbles and quote bubbles to each of the scenes using the pre-formatted shapes in the "Insert" ribbon of Word.

(In the image above, the students' faces have been omitted. In the final product, they are visible.)

By acting out the scenes, then coming back and adding captions, I have found that the students have a more complete and retrievable memory of the events. The activity also made for a fun day outside and a very real opportunity to students to take responsibility for making choices about the most important scenes and planning the scenes themselves. We had a great time participating in this activity and as the students get more comfortable with the procedure, it can be easily applied to reading, science and other content areas.

Wednesday, October 16, 2013

Snapshots of Life, or Teaching with Photojournalism

When I was still a young student myself, I remember how much I was struck by the images in Peter Menzel's Materials Worlds photojournalism project. It's a cliche to say that "pictures are worth a thousand words," but in this case, a single image did more to describe everyday life for average families around the world than prose ever could.

I have taught lessons based on these photographs a few times to teach a huge idea that I simply call "worldly thinking." A few years ago, I heard about a similar project by another photographer, James Mollison. His gallery of images shows Where Children Sleep and again, a single image shows the radical disparity between the way different people live from country to country, even from town to town. I was so struck by these complimentary projects, that I blogged about it here on SpenceSpace back in 2011.

Well, I'm back again with another similar project and this time, the uses for the images can be used for "worldly thinking" instruction, but also to discuss nutrition and health. Peter Menzel has started another project, featured here on Nutrition News, showing a week's worth of groceries from various countries around the world.

Some viewers will be affected by the sheer quantities of food in the industrial world versus the simple sacks of grain in the developing countries featured. Others, however, will be struck by the amount of fresh produce in so many homes compared to the piles of processed and prepared foods in Europe and North America. Either way, the images can be used for a host of lessons about culture, food, nutrition, globalism, or just that big notion of "worldly thinking."

As the world continues to become more global, there are still massive disparities between lifestyles around the world. There are few ways to show this better to students than with a series of photographs that do more for their understanding than words or explanation ever could.

Wednesday, May 1, 2013

What if the Patriots had Facebook?

In preparing for our upcoming lesson on colonial upheaval before the American Revolution, I was reading through our textbook and their discussion of the Committee of Correspondence. Just like so many revolutions in recent history, the political activism of the colonial period was spread through social networking.

We discussed how grassroots protest and activism almost always spreads this way during the lesson and many students were aware of the role of Twitter, Facebook and other social networking sites in the fostering of political action today. The Patriots, however, communicated between colonies with a network of letters and express riders up and down the east coast. This discussion got my brain juices flowing...

Any of us who spend a decent amount of time on the web have probably seen fake Facebook walls about everything from TV shows to historical events. One that my family and I recently enjoyed was a spoof of an episode of PBS's Downton Abbey. I thought about how the Patriots would have communicated had they access to Facebook, and I also wondered how this could incorporate their fluency with the medium of social networking and their senses of humor and creativity.

I got to my laptop, opened up my Facebook wall and created a Word template with editable text boxes that looked just like a real Facebook page. I have included an image of the template below, but you can also download the document with the link provided.


View and download the template as a Google doc here.

For our purposes, we created these Facebook farces on 11" x 17" and printed them in color to hang in the hallway. The kids showed off their knowledge of the colonial activists by joining them into groups like the Sons of Liberty and inviting them to events like the Stamp Act Congress. They also added some humor in their interactions between figures and "liking" various slogans, pictures and events.

The potential for these types of projects is endless. This template and the idea could be used for characters in literature, any historical figures, or even more abstract concepts, like personifying geometric shapes or elements from the periodic table. Please feel free to share how you have used Facebooking in your lessons!

Tuesday, April 23, 2013

Battlefort

In my previous post, I described how fun it can be to recreate games that kids already know with new rules adapted to the curriculum. We did just that again this week with a modified version of Battleship that simulated the conflict during the French and Indian War.

Because the French and Indian War was not a naval battle, I gave each student a grid and allowed them to set it up as they liked. Each student was also assigned a country - either Britain or France. We color-coded each of the squares as either French territory (blue), British territory (red), or disputed territory (purple). Because the grid was an 8 x 8 arrangement of 64 squares, I gave the students the following parameters to keep the game fair:


  1. You must have 20 blocks of your own color, 20 blocks of the opposing color and 24 blocks of disputed territory.
  2. You can arrange the blocks in any way as long as the French blocks are all together on one side or corner of the board, the British blocks are all together on the opposite side or corner of the board and  the purple disputed blocks are somewhere in the middle. 
Also on the grid handout were three forts which were exactly 3 blocks wide and 1 block tall, and two settlements, which were 2 blocks wide and 1 block tall. Once they had finished color-coding the area of the map, they could cut out the forts and settlements and arrange them anywhere within their own or the disputed territory. For a faster set-up of the game, you can also provide the students with pre-colored grids, even labeled with place names and boundaries if you wish. 


Now they were ready to play the game! To create the "boards" for the game, I used basic file folders. I set up another identical grid with letter and number coordinates and printed it in the copier on transparency film. I stapled two sheets in each folder - one on the bottom for the students to slide their own grids underneath and a second to the top flap of the folder for keeping track of their own called coordinates, hits and misses.


With the grids printed on transparency film, the students can mark both boards with dry erase markers, eliminating the need for pegs or bingo chips. We simply used Xs for hits and Os for misses. This was a lot neater and made for a lot less preparation!

The final boards looked like the image below. I decided to assign a point value to all possible outcomes to make things a bit more interesting. In our game, we used the following scoring system:

  • hit opposing territory (empty square) = 2 pts.
  • hit disputed territory (empty square) = 1 pt.
  • hit your own territory = 0 pts.
  • hit anywhere on a fort = 10 pts.
  • hit anywhere on a settlement = 5 pts.
Students kept track of their points on scrap paper or on the margins of the grid in dry erase.

I was pleasantly surprised by how much the kids enjoyed setting up the boards and playing the game. Even though their boards did not exactly imitate the land boundaries of the French and Indian War, the idea of disputed territory certainly stuck with them. I even overheard someone call out at one point, "This must be the Battle of Quebec because I am really kicking your butt!" :)


Monday, April 22, 2013

Flap Maps

Sometimes, to really visualize a territory or battle, you just need a good map. But sometimes, in order to effectively study, you also need to hide your information to really assess your own recall and understanding. As a visualizing tool and a study strategy, we recently made "flap maps" to show the expansion of New Spain into New Mexico and Florida. Using just Microsoft Word, these maps are really easy to make and get the kids moving with some color-coding, cutting and gluing.

In essence, a flap map is just an outline map with titled text boxes scattered around at key points. The students then color-code the map according to a self-made key. I then send them a second document with text boxes in the same arrangement as the titled text boxes on the map page. When the students have finished with the initial sheet, they fill in key facts about each of the named sites. When the fact sheet is printed, it will line up perfectly with the map boxes. The students can then cut out three sides of each text box on the map page.

Once the students have glued the fact sheet to the back of the map page, the map text boxes are now "doors" or "flaps" that can be opened and closed. When opened, the facts from underneath are revealed for studying. The map can also easily fit into student binders and folders for quick reference later!

Below are some images of the Word templates I created, as well as a few pictures of the finished maps.


Thursday, April 18, 2013

Pin - the - ?? - on - the - ??

I like incorporating games into classroom instruction and one really easy way to make it transition seamlessly is to use games the students already know.

When reviewing Jacques Marquette and Robert La Salle's exploration of the Mississippi River for France, I wanted an engaging way to review which facts belonged to which explorer. I decided to play a version of Pin-the-Tail-on-the-Donkey with "fact canoes" in place of tails and a Mississippi River with images of the explorers in place of the donkey.

I was a little leery that the kids would find it too juvenile, but we ended up having a blast! I presented each fact and asked the student whether the fact belonged with Marquette or La Salle. They responded, then they were blindfolded, took their spins and attempted to stick the canoe in the river with the explorer that matched.


The set-up was really simple -- I typed up some images of canoes with facts, pictures of the explorers and I cut out a long construction paper river. I attached the pieces to the whiteboard with magnets for easy removal when other teachers needed to use my classroom. The game only lasted about 10-15 minutes, but it was a fun way to wrap up after the notes and video segment we completed at the beginning of class.

Of course, this got me thinking about all of the things that could be "pinned" onto something else. Younger students could sort shapes and colors into a chart. They could place letters in a puzzle. Older students could pin the element to the periodic table or the organelles to the cell. The possibilities are endless!

Alphabet Books: Bringing Together Younger and Older Students

One of the many benefits of teaching in a school with a wide range of ages is the ability to collaborate across many grade levels. Older students are often excited to engage with younger students, just as younger students often look up to their older peers. In order to capture this natural energy and opportunity for community building, I like to create alphabet books each year about a concept or theme, then share them in with younger students either live or through circulation in the library.

This year, I had to cover everyday life during the colonial era, but had much difficulty finding sources, activities and materials appropriately challenging for middle level students. A quick Google search will make it abundantly clear how much of what is out there is for primary students. I figured that I might as well embrace the over-arching trend and use the alphabet book as a final project for this particular section.

I provided the students with several sites about colonial life, most notably PBS's Colonial House materials and Colonial Williamsburg's history site. From there, students refreshed their previous knowledge of colonial occupations (see post about classified ads project), as well as vocabulary terms and concepts. I assigned each student a few letters and they designed a page for each letter, designating a word for each letter. I scattered a few sample alphabet books about countries of the world, musical instruments and science topics around the room just to demonstrate the basic format, then let them go wild.

Between all 48 students, we were able to generate three unique books for the library, each with creative ideas for the letters. Some students tackled more abstract themes, like agriculture and slavery, while others chose figures and events, like Jamestown, John Peter Zenger and the Salem Witch Trials.


I bound the books together with a simple plastic comb binding machine and shared it with the school library. Shortly after, our librarian asked for the electronic files of the pages so that we could attempt converting it into its own ebook! Who knows, maybe younger students will soon be able to check-out our alphabet book both at the library and electronically! If this works well, we might just have a lot a ebook publishing in our future!

Monday, March 4, 2013

Evil and Treachery are Afoot!

Earlier in the year, many students read a historical fiction novel about the Salem Witch Trials in their reading classes. Now that we are studying the colonial experience in America, I realized that our textbook skips over the trials completely. I figured that we should spend some time talking about it for a few reasons: one, to provide further context for the literary experience they have already had and two, to show the cultural climate of the colonial era and the constant fears of colonial people.

To introduce the topic, I sent each student home with a "top secret" note in an envelope explaining their role for Monday's mock trial. I didn't tell them we would be having a trial as I wanted to pique their curiosity with the letters. I also told them that they were not allowed to share the contents of their letter with anyone else.

In each class, two "secret" students were selected to be witnesses against the accused, one person was the accused witch, and everyone else served as jurors. The jurors and the accused were only given vague instructions about when and where to appear and to keep their assignments secret, but the witnesses received secret directions about how to behave based on real testimony from the trials.

Images of the letters are shown below:


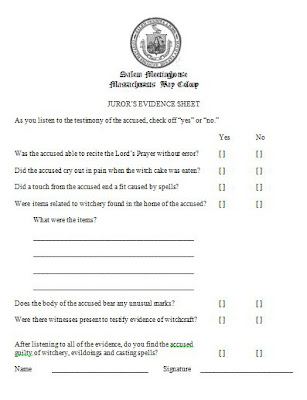
On trial day, I checked in with the witnesses to make sure they understood the expectations (and limitations) of what they could do during the trial. I put on my trusty judge's robe and asked the accused questions based on real tests and evidence used during the trials. The jurors observed and tracked the evidence on their checklist, shown below. At the end of the simulation, the jurors and the judge decided the fate of the accused. Needless to say, the accused were pretty much always found guilty.


Though the activity lasted only about 15 minutes -- and given the rambunctious nature of it, I wouldn't want it to last much longer -- it was a great introduction to the topic. Over the next few days, we watched a documentary video about the trials and the possible causes for the hysteria. We created a graphic organizer sorting the various potential causes including scientific, psychological, cultural and historical factors that contributed to the panic. 

All in all, I think this type of simulation and analysis was a great way to reflect on and engage in the literary experience they had earlier in the year.


Wednesday, February 20, 2013

Polling and Surveying to Differentiate and Inform

We all know that education is headed in a new direction -- a direction that is more interactive and more tailored to individuals, a direction with more instantaneous and long-distance feedback. A great way to reach out to students and parents is with web-based surveys and polls.

Polls and surveys can be used to accomplish the following goals:

  • differentiation - You can tailor your instruction to suit the needs and wishes of your student population or discreetly collect information on student strengths and weaknesses. You can also gauge student interest and levels of experience in a particular subject matter before you even hold class the next day.
  • interaction - There are few ways that are easier to engage with parents quickly and easily than asking them to participate in a simple survey or poll. Many parents are busy and removed from emails just as often, if not more often than we are. Sometimes it is difficult to get parents to commit to regular checking-in on grading sites, webpages and blogs. Many of these polling and surveying technologies allow people to engage from phones and tablets, as well as their computers and are much quicker and easier than emailing.
  • organization - In the middle school years, we are often teaching organizational skills like studying, prioritizing and time management just as much as we are teaching content. As the world becomes more reliant on electronic means of timekeeping and organization, so should you! Well-timed polls and surveys can guide students through the process of developing positive habits and inform you about which strategies work best for particular learners.
Below are some sites that provide polling and surveying tools:

Poll Everywhere - This site has some free features, as well as a paid membership with more features. It allows users to create polls with text-in capabilities and online tracking.

SurveyMonkey - Customized surveys with multiple choice and open-ended questions can be blasted to email addresses and the results are compiled online in a user-friendly template.

SoGo Survey - Also a free- or subscription-based site, this tool has many customizable features and tracking tools outside the basic abilities of other sites. 

Kwik Surveys - Another free, web-based survey maker, similar to Survey Monkey.

I recently heard a discussion about polling parents and students, and I was immediately reminded of all the online survey and polling tools that I have seen over the past few years from various sources. I look forward to trying some of these tools in the near future and you can be assured I will post some data to this blog!

Tuesday, January 29, 2013

History Mystery - The Lost Colony of Roanoke

Between enjoying our winter break and the recent midterm exam period, it has been a little while since I have posted. Upon returning from break, we wrapped up our unit on early Spanish colonization in the Americas, then began reviewing for the midterm exam. With this week's half days and exam schedule, I have been devoting a lot of time to planning our next historical endeavor, so a blog post was not only long overdue, but much needed!

To kick off our unit on British colonization, we will begin with a "history mystery." The first section of the book briefly discusses the Roanoke Colony, but knowing my students' love for a good mystery, I thought I would expand on this opportunity with some detective work and a writing assignment.

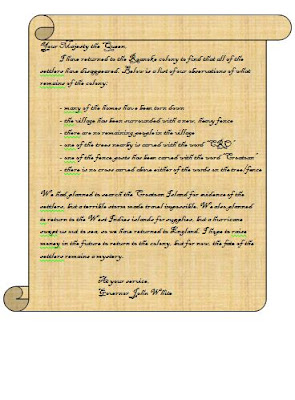
On the first day of the unit, students were grouped into pairs and received a "dossier of evidence" about the colony in a manila folder. I created each of the documents to show a particular event in the history of the colony. With the exception of the names on the ship's log, all of the documents are fictional and I wrote them to show a particular moment in the sequence of the story based on true accounts. (Please keep this in mind if you use the documents yourself!)

The students were asked to go through the dated materials, order them by date and use their timeline sheet to create a pieced-together narrative of the events. This took 1-2 class periods depending on the reading abilities of the students. Once they had a sequence of events, they then used the template to create a narrative essay of what occurred. This essay should be fact-based in part according to the documents, but the students were given freedom with the last section to make a hypothesis about what happened to the people of the colony.

Below are some images of student work, as well as image versions of the documents: